
 The first thing I want to do is to get the engine running. Then, I figure I can drive it around a little before the weather turns cold and discover all of the other things I will need to do in order to call it “restored.” I wasn’t sure what to expect. After all, the car did come with a second engine. You usually don’t keep another engine around for 22 years unless there is a reason, right?
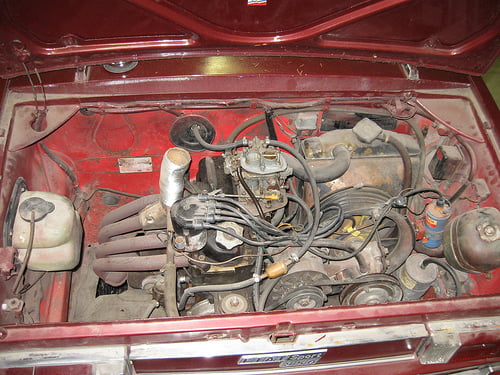
So, I am looking into this engine compartment and it seems a little tight. For starters there is an engine mount directly above the flywheel. The “A” like mount is between the engine and the sheet metal at the back of the car. Now I know why the lines to denote TDC (Top Dead Center) on the flywheel are where they are. If they were anywhere else, you would not be able to see them.
Also, a word of advice. A low stool to sit on is a great idea. The top of this engine falls just above my knees. There is a lot of bending over or kneeling on the ground.
I was looking around trying to plan the attack and I started noticing that the seams of the metal seemed to be in odd places. Turns out, this car’s engine compartment was designed to be worked on by taking the whole back of the car off. Well, at least the rearmost face of sheet metal. So, I started in on taking it off and giving myself access to the engine.
I had taken the deck lid off earlier and now remove the bolt that mounts the engine to the back of the car.
First, I disconnected all of the wires to the taillights. They are three bulbs in each taillight. They are covered by a little boot and then the wires are just spade connectors. There was also a coolant hose and a line to the pre-heater on the exhaust manifold. They are both held in place by two bendable metal strips. Once everything is disconnected from the back, there are 3 nuts on each side to remove. The rear bumper is actually two pieces and are held in by a bolt at the end of the half-bumper on the side of the car, a bolt at the other end of the half-bumper in the middle of the back sheet metal. Finally there is a mounting bracket that goes through the sheet metal and bolts to their respective frame rails. Once the bumpers are free there are some bolts along the bottom lip. It is pretty easy to remove after that. Once it is out you have a lot of room, relatively speaking, of course.
You can see the cover on the end of the flywheel. I took the bolts out and tried to turn the flywheel with a 2 ft. breaker bar. It wouldn’t budge. My uncle, who is a lot stronger than I am tried and he couldn’t get it to budge either! Looks like the next step is to tear down the engine. It went pretty well. I put a lot of baggies together in order to keep everything together.
After removing all the cables , fuel lines and electric wires, I took off the distributor cap and the mounting tower. Then the valve cover. The cam was next, then the Weber carb. The carb was difficult because I didn’t have a metric wrench set. I know, I know, it seems like that would be something to have first, but in all of the excitement, I just forgot. The nuts are just hard to get to. Once it was off I removed all of the head bolts and the nuts on the exhaust manifold. When it was off and after I cleaned up all the coolant It looked like 3 of the 4 cylinders were in decent shape. The fourth, the number 3 cylinder had a bunch of crud in it. We thought it was rusted away and shot. A little penetrating oil, a screwdriver and a light touch got it pretty well cleaned up. The walls of the cylinders that we could see looked very smooth. I put some Marvels Mystery Oil into 1,2 and 4 and some more penetrating oil into number 3. I called it a day.
I am hoping that when I come back to it on Monday the oil will have made its way down into the cylinders. At least then when I really start to work at moving the pistons they will be lubed up enough not to damage them.
Since I have a lot of time to wait over the next few days in order for the oils to move, I will be posting some information on the car and the engine. That will be fun.
Here are the pictures from the engine tear down.